

Appearance
Mergin Maps QGIS Plugin Overview
The Mergin Maps QGIS plugin allows you to work with your Mergin Maps projects in QGIS, whether it's downloading the project to your computer, making changes in the project, seeing the project's status or synchronising changes to the cloud.
To get started, you will need to install and configure the plugin.
Once installed, plugin's entries will be added to the QGIS toolbar panel, Browser panel, Project properties and to the Processing toolbox.
Upgrade the plugin regularly
To ensure you can use the latest improvements, don't forget to upgrade the plugin whenever there is an update available!
Mergin Maps toolbar in QGIS
The Mergin Maps toolbar is added to the QGIS toolbars panel after installation.
![]()
If you don't see Mergin Maps toolbar, make sure it is enabled in QGIS toolbars panel

The toolbar contains following buttons:
the Mergin Maps logo is a shortcut to app.merginmaps.com

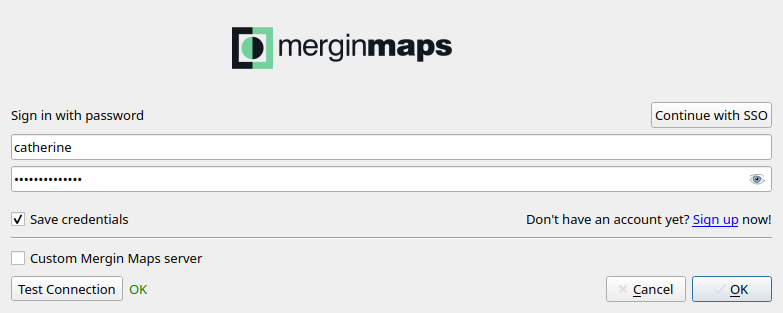
Configure Mergin Maps plugin to configure plugin to connect to Mergin Maps or a custom server

Create Mergin Maps project to create or package a QGIS project


Synchronise Mergin Maps project to inspect and synchronise or reset changes made in the current project


Project history to inspect project history and versions


Mergin Maps plugin in QGIS Browser
Once you have installed the QGIS plugin and configured it with your Mergin Maps credentials, you should be able to see it in your QGIS Browser panel.
The name of the current workspace is displayed in the square brackets (here: sarah) and available projects are listed underneath.

Right-click on the workspace name to easily access options to configure the plugin, refresh, create new project, find a project in your workspace, switch workspace or explore public projects.

Downloading a project in QGIS
TIP
Detailed steps on how to download and open your Mergin Maps project are included in the Opening Surveyed Data on Your Computer tutorial.
Right-click on a project in the Browser panel and select Download

Browse to the folder, where you want to save the project and click Select folder. The project will be downloaded here.
WARNING
Do not use shared network drives or cloud storage (such as OneDrive or Google Drive) to store your Mergin Maps projects. It is not supported and can cause errors.
Once the download is completed, you will have the option to open the project in QGIS.
Exploring public projects
Right-click on the Mergin Maps entry in the QGIS Browser and select the Explore public projects option

Find the project you are interested in. Use the search bar to limit the choices.

Select the project and click Open project. Browse to the folder where you want to save the project. The project will be downloaded here.
TIP
You can package this downloaded project using Mergin Maps QGIS plugin as described in Create a project in QGIS using the Package current QGIS project option and use it as your own Mergin Maps project.
Mergin Maps Project Properties
Some settings of your Mergin Maps project can be done through  Project Properties, such as:
- Selective sync to avoid synchronisation of unnecessary or large files
- Photo quality of pictures added to the project
- Enable snapping in the mobile app
- Photo name format for photo attachments fields
- Enable position tracking and choose its precision level
- Enable Map sketching
- Set Layer order for the mobile app
- Enable Photo sketching to annotate pictures in the mobile app
- Enable Filtering features in the mobile app


Mergin Maps Tools in QGIS Processing Toolbox
Processing is a core plugin of QGIS. By installing Mergin Maps QGIS plugin, Mergin Maps tools are added to the Processing Toolbox.
Use the Toolbox icon in the toolbar panel to display Processing Toolbox in QGIS.

Create diff (Processing toolbox)
Create diff is a tool that extracts changes made between two versions of a layer in your Mergin Maps project to make it easier to revise changes.
Navigate to Mergin Maps tools in the Processing toolbox in QGIS
Double click the Create diff tool and fill in the parameters in the dialog window. Click Run.

The diff layer is added to the Layers panel. Changes are visualised on the map and also in the attribute table of the layer.

Create report (Processing toolbox)
Create report tool provides an overview of changes in your Mergin Maps project for a range of project versions. The output is a CSV file, which can be opened in QGIS and also in common text and spreadsheets programs.
Navigate to Mergin Maps tools in the Processing toolbox in QGIS
Double click the Create report tool.
Fill in the parameters in the dialog window. If you want to get the report for a specified range of versions, define also the start and end version.
Click Run.

The report is added to the Layers panel.

Download vector tiles (Processing toolbox)
This tool can be used to easily download vector tiles for offline use. Go to Downloading vector tiles using Mergin Maps QGIS plugin to see how it works.
Extract local changes (Processing toolbox)
Local changes of a specific layer can also be extracted using the Extract local changes tool in the Processing toolbox.
Navigate to Mergin Maps tools in the Processing toolbox in QGIS
Double click the Extract local changes tool. In the dialog window, enter your project directory and select the input layer. The output local changes layer can be saved as a file or as a temporary file. Click Run.

The local changes layer is added to the Layers panel

Mergin Maps in QGIS Plugins menu bar
Plugins menu bar in QGIS contains also Mergin Maps options:
- Mergin Maps is a shortcut to app.merginmaps.com
- Configure Mergin Maps plugin can be used to configure plugin to connect to Mergin Maps or a custom server
- Configure DB sync can help you generate a initial configuration file for DB sync
