Attributes Form Configuration
In addition to setting up edit widgets and designing the form layout, extra configuration can be done to the fields in QGIS to make the data collection easier and more consistent.
Here is a tutorial video on how to configure forms that includes the usage of default values and constraints:
Default values
Default values can be used to automatically record, e.g, the name of the surveyor, date and time of the survey, latitude and longitude of a feature or to have frequently used values filled in advance (see QGIS documentation).
Fields with default values can be hidden from the attributes form if they are used to store data that are not expected to be modified manually.
The default value can be a text, number or a QGIS expression. The data format of the field has to match the result of the default value expression you want to use.
In QGIS, default values can be set up in the Attributes Form tab in Layer Properties. In the Defaults tab, you can enter the default value of the selected field (manually or using an expression).

Check the option Apply default value on update ✔️ to update the field value after every change of a feature. Note that this means that the value of this field cannot be changed manually in QGIS or in the mobile app as any user input will be overwritten by the default value.
This option is therefore useful for fields that can be recorded automatically without the need of modification, such as parameters derived from geometry (e.g. coordinates, length, area) or usernames, dates, times.
Example project available
Various usage of default values can be explored in more detail by downloading or cloning this public project documentation/form_setup.
Recording usernames, dates and times automatically
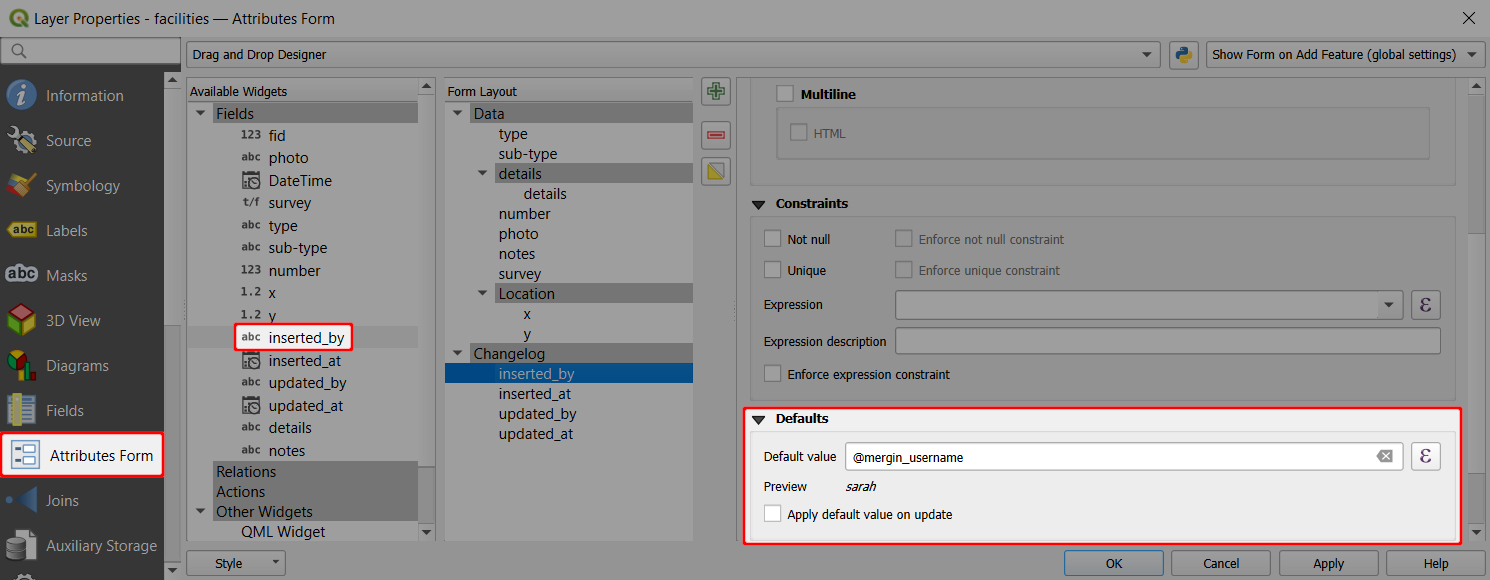
Let's set up an attributes to record the Mergin Maps username of the surveyor who created a feature:
- Right-click on a layer, select Properties and go to the Attributes form tab.
- In the list of Available Widgets select the text field you want to use (here:
inserted_by) - In the Defaults tab, define the Default value as
@mergin_username. Do not check the Apply default value on update option ⬜.
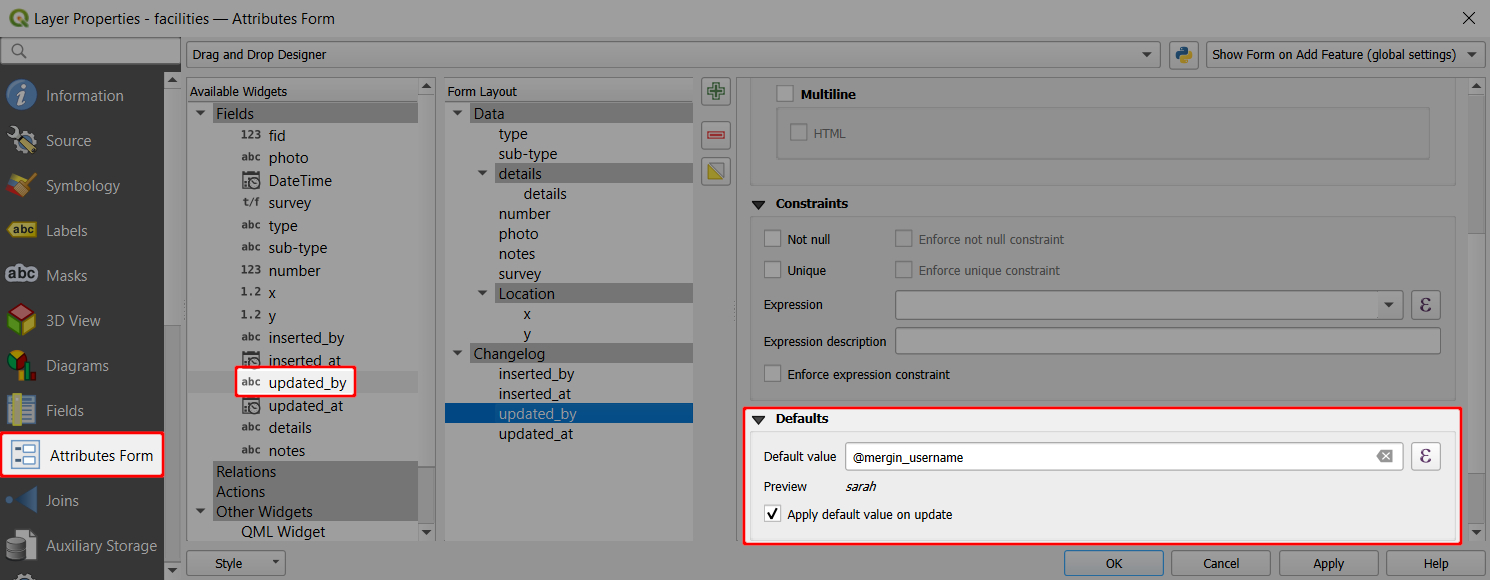
To save the Mergin Maps username of the surveyor who modified this feature, the steps are similar:
- In the list of Available Widgets select the text field you want to use (here:
updated_by) - In the Defaults tab, define the Default value as
@mergin_username. Check the Apply default value on update option ✔️. The field will be updated anytime the feature is modified, saving the name of the surveyor who made the changes.
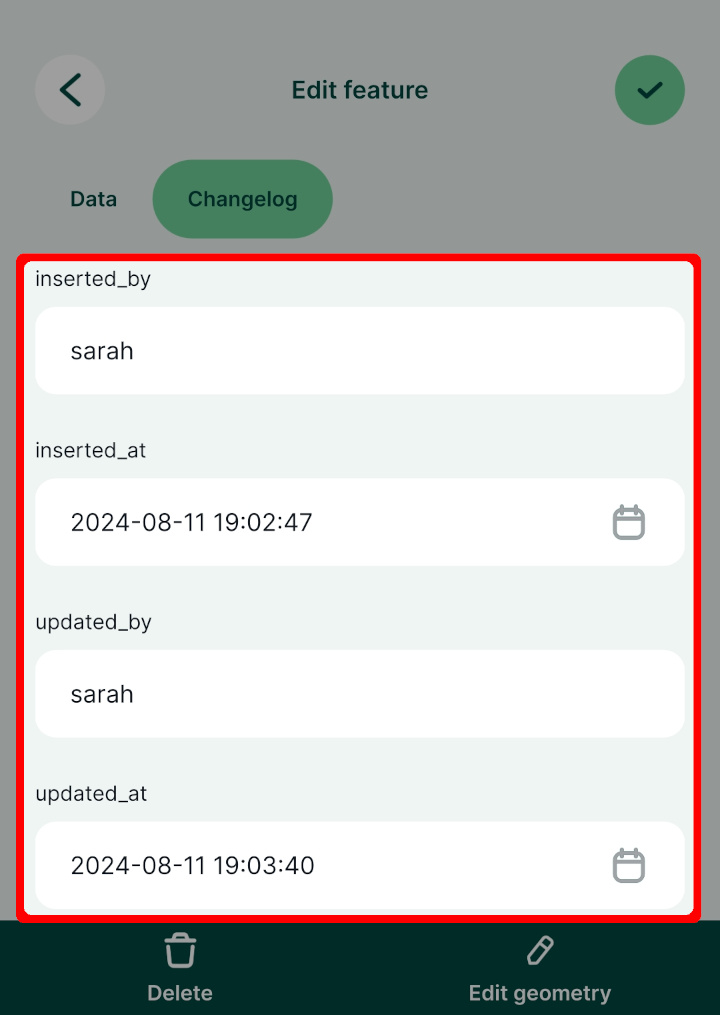
Follow the same steps for attributes to store the timestamps of when the feature was created and updated (here: inserted_at, updated_at), using the now() expression as Default value.
When the form is opened in the mobile app, the default values are automatically filled in:
Automatically transform and record coordinates of a point
Here we are going to set the default values for x and y field to be longitude and latitude.
- Right-click on the survey layer and select Properties
- In the Attributes form tab, select the
xfield in the Available Widgets column on the left - In the Widget Display, set the Alias to Longitude
- In Defaults tab, define the Default value as:Note that the expression transforms the point from EPSG:3857 (map and layer coordinate reference system) to EPSG:4326.
x( transform( $geometry, 'EPSG:3857', 'EPSG:4326')) - Check the Apply default value on update option ✔️.
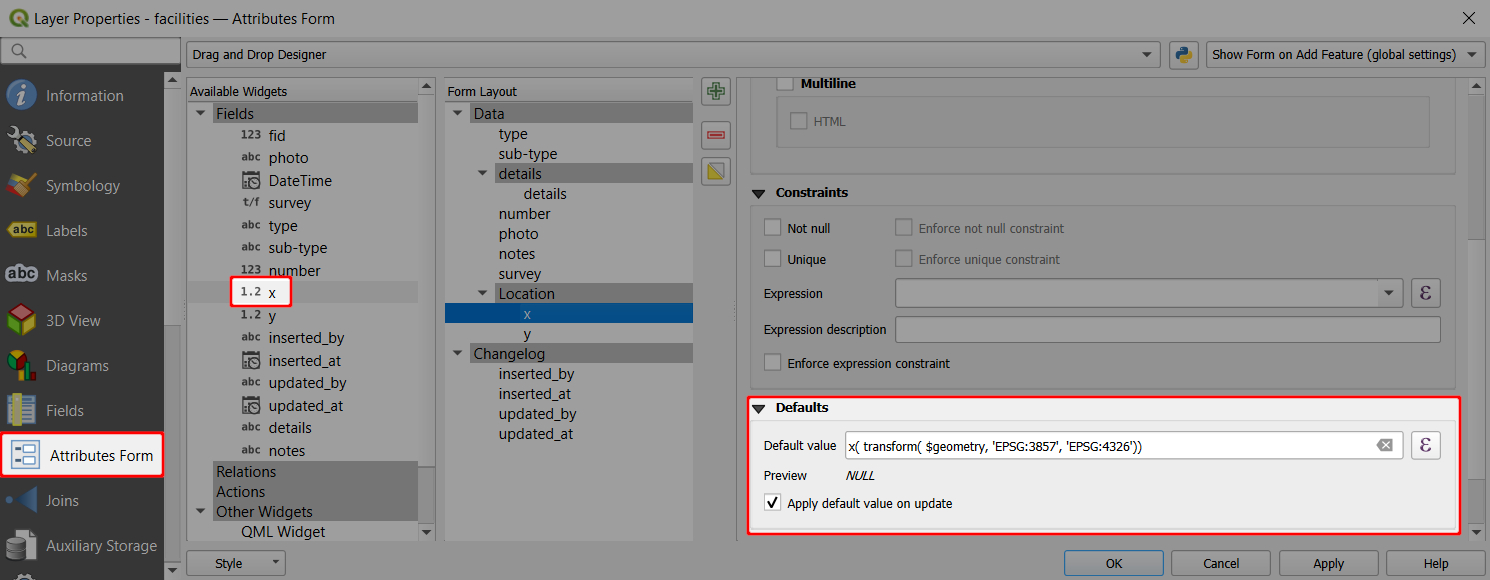
Repeat the same steps for y field and setting the Alias to Latitude and the default value to
y( transform( $geometry, 'EPSG:3857', 'EPSG:4326'))Don't forget to save and synchronise your project!
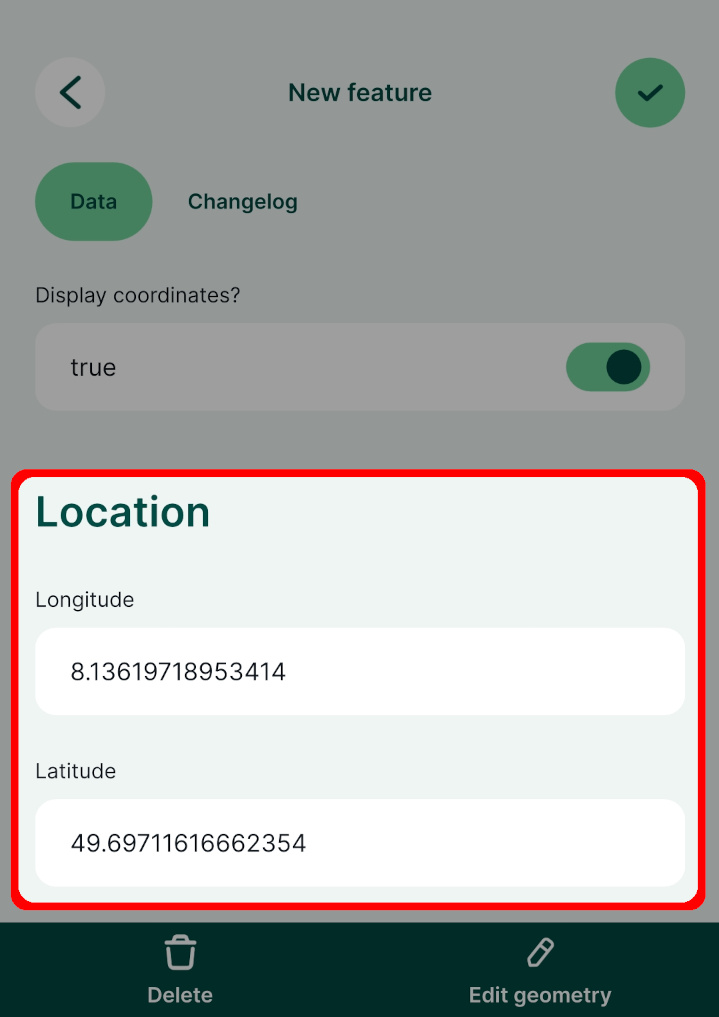
When adding or editing features in the mobile app, the coordinates are automatically filled in:
Examples of useful default values
There are some commonly used default values that can be useful in your field survey.
It is convenient to know when a feature was created and when it was last updated. Use fields with Date or Date&Time data types with the
now()function to record this information. You can change the formatting using the Date/Time widget.The name of the Mergin Maps user who created or modified the feature can be recorded using the
@mergin_usernamevariable. These fields should use Text (string) data type. There are also other extra QGIS variables related to your Mergin Maps account or service that can be used as default values.The coordinates of a point feature can be recorded as well using the
$xand$yfunction in QGIS. To record the coordinate accurately, these fields should have the Decimal number (real) data type. If the coordinates are in metres, values can be rounded to, say, 2-3 decimal places. When working with geographic coordinates that use degrees, you may want to round the coordinates to 8 decimal places. Use the apply default value on update option so that you have correct values when the position of the point feature changes.Parameters such as length of a line feature or area of a polygon feature can be calculated from the geometry. These fields should have the Decimal number (real) or Integer data type. Use the apply default value on update option to update the field in case there is a change in the feature.
Extra Position Variables can be used to record GPS information from your mobile devices
Here are some examples:
| Variable name | Sample value | Apply default value on update | Description |
|---|---|---|---|
@now | 2024-06-30 10:00:00 | no | The timestamp of when the feature was created. |
@now | 2024-06-30 10:30:00 | yes | The timestamp of when the feature was last updated. |
@mergin_username | sarah | no | Name of the user who created this feature. |
@mergin_username | jack | yes | Name of the user who updated this feature last. |
round($x,2) | 1898789.92 | yes | The X coordinate of a point feature, rounded to 2 decimal places. |
$length | 123.45 | yes | The length of a line feature. |
$area | 1234.56 | yes | The area of a polygon feature. |
uuid() | {9d0150eb-a36f-40f1-a768-540db8a36f7c} | no | Generates |
Open local files using default values
Default values can also be used to open local files (e.g. a PDF file) from within the form. This file needs to be packaged with the project, so it should be stored somewhere in the project folder.
There is a public project documentation/forms-display-images-and-files you can download or clone to see how the setup works.
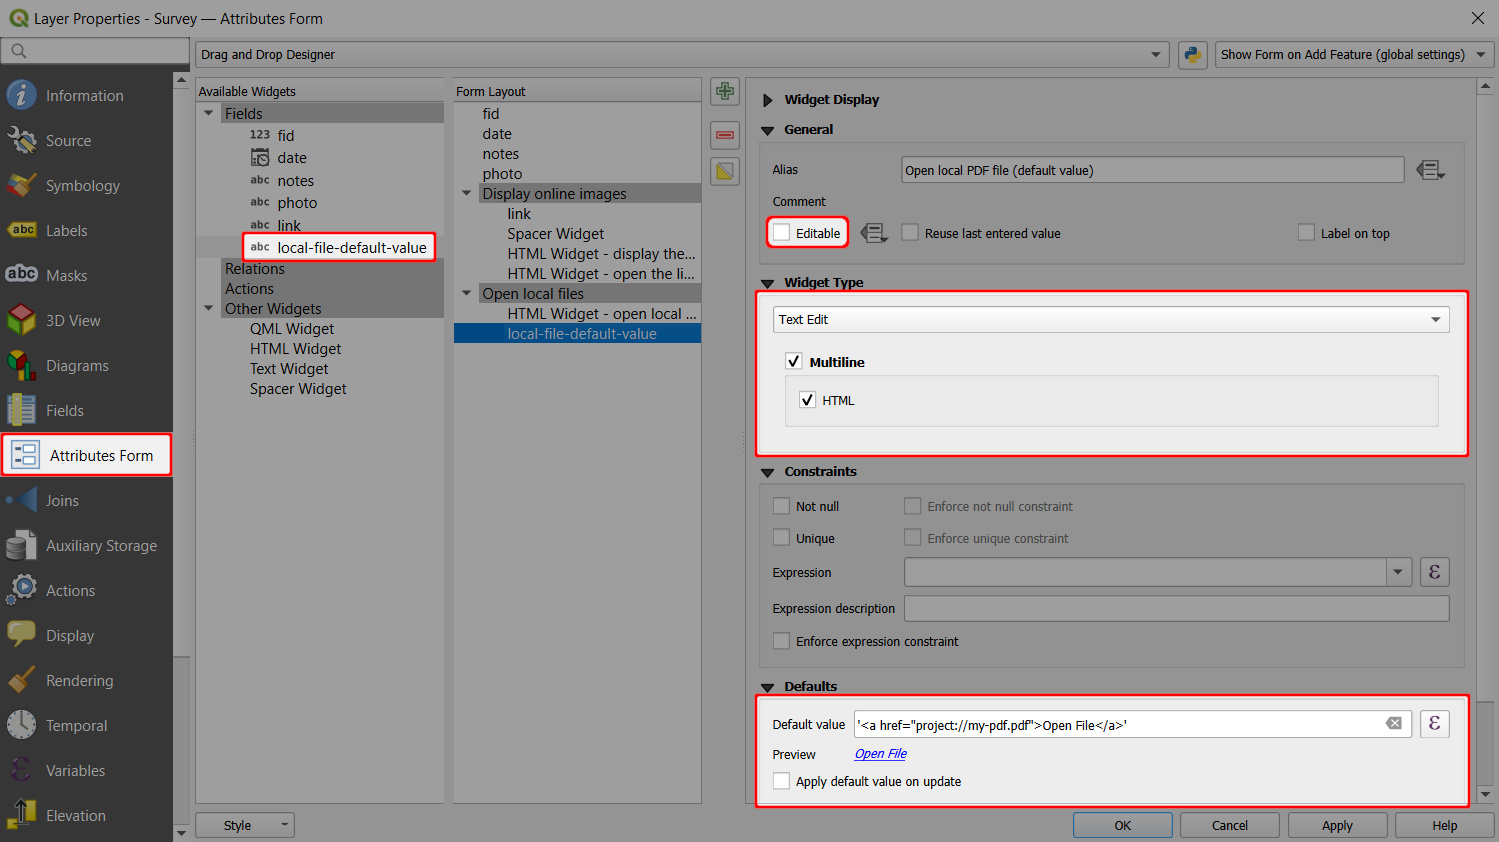
- A PDF file named
my-pdf.pdfis stored in the main project folder. - The survey layer has a field named
local-file-default-valuewith Text (string) data type.- This field is set to not editable (the form will refer to the same file for all features and does not need to be changed).
- This field uses the Text Edit widget with the Multiline and HTML options enabled.
- The default value is set to:
'<a href="project://my-pdf.pdf">Open File</a>'
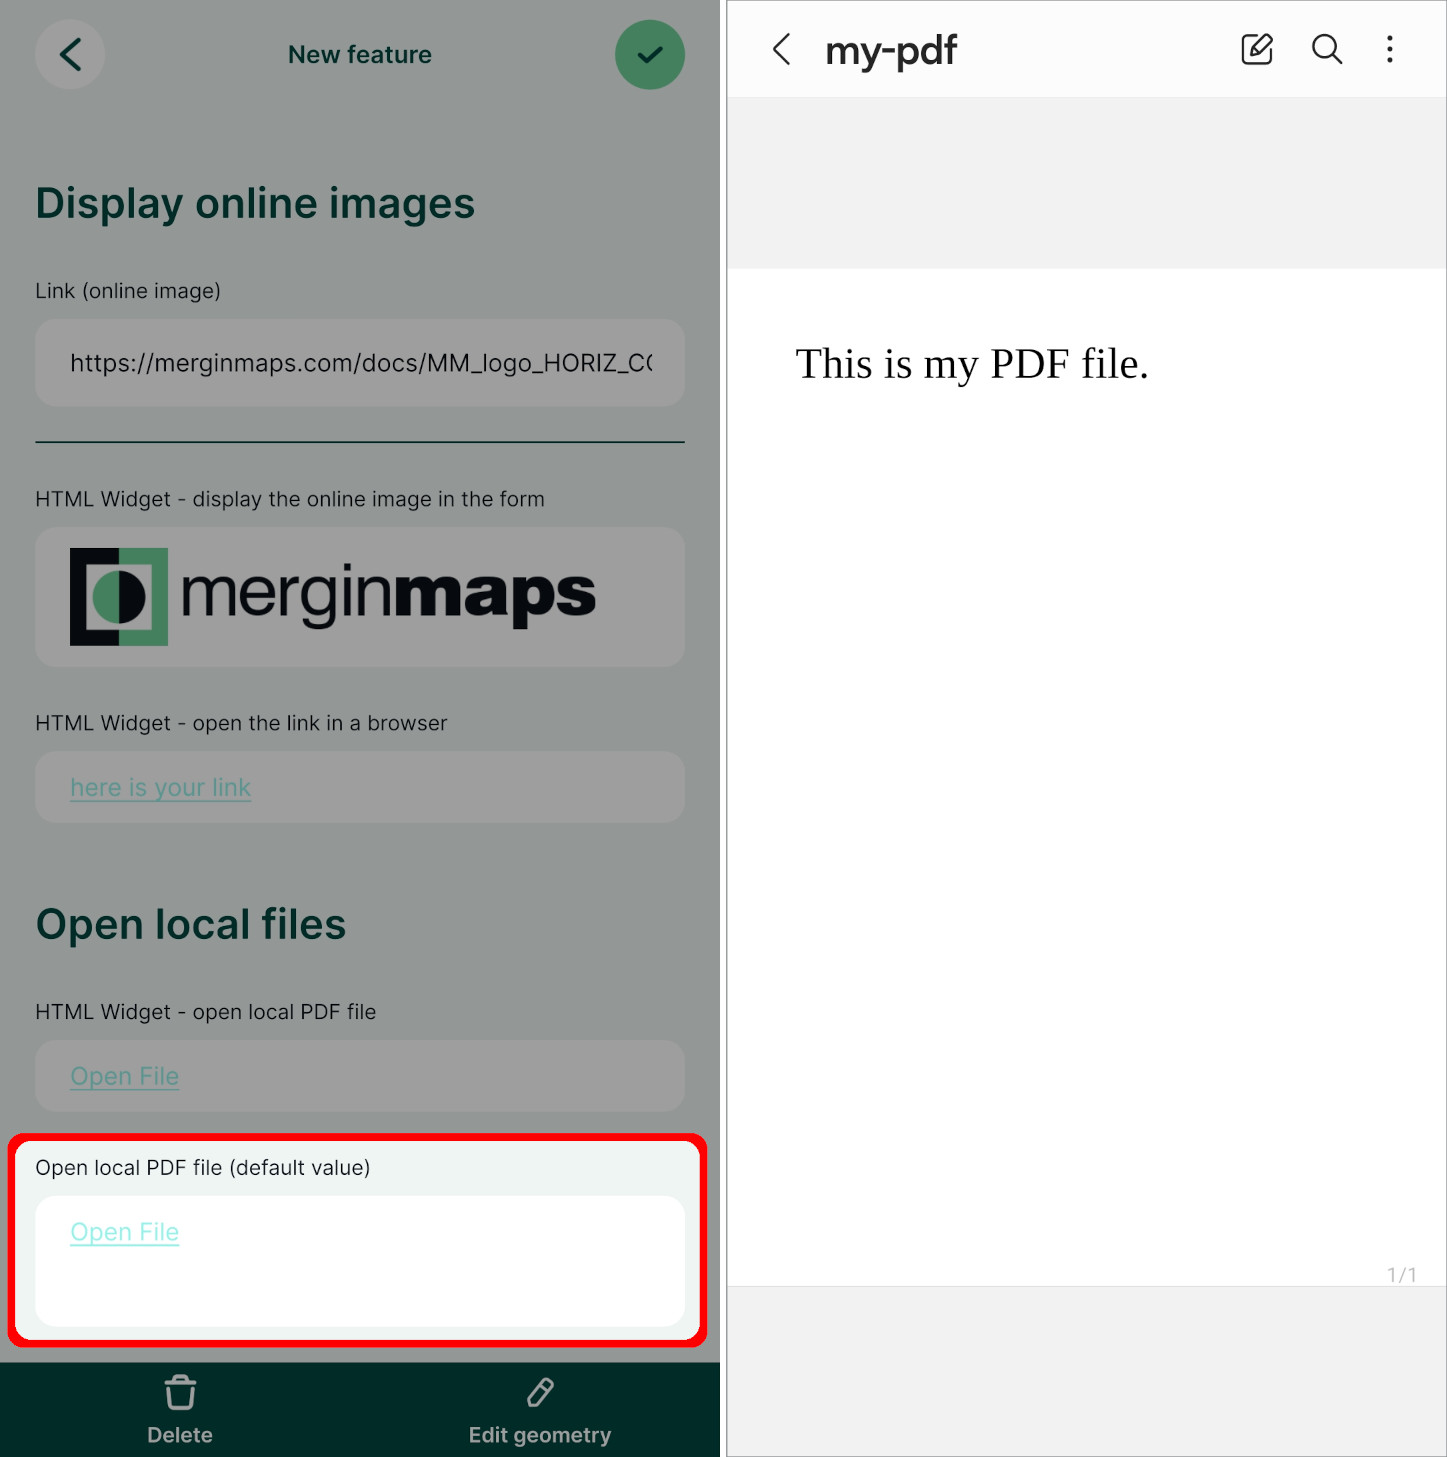
In the mobile app, you can tap the Open File link to open the PDF file using the default application of your device.
Open local files using the HTML widget
Local files can be displayed in the form also using the HTML widget.
In the documentation/forms-display-images-and-files project, you can explore and compare both alternatives.
Constraints
Constraints help to avoid mistakes when filling in the values or to highlight mandatory fields. Fields with constraints have a warning displayed next to them in the form.
There are multiple options of setting up constraints in QGIS, such as Not null (the field has to be filled in), Unique (the field has to have a unique value), or using a custom expression.
Check the enforce constraint option ✔️ to use a hard constraint, meaning that the feature cannot be saved if the constraints are not met.
Using hard and soft constraints in the form
Example project available
Constraints are used in this project documentation/form_setup. Clone or download it to try it to see how it works.
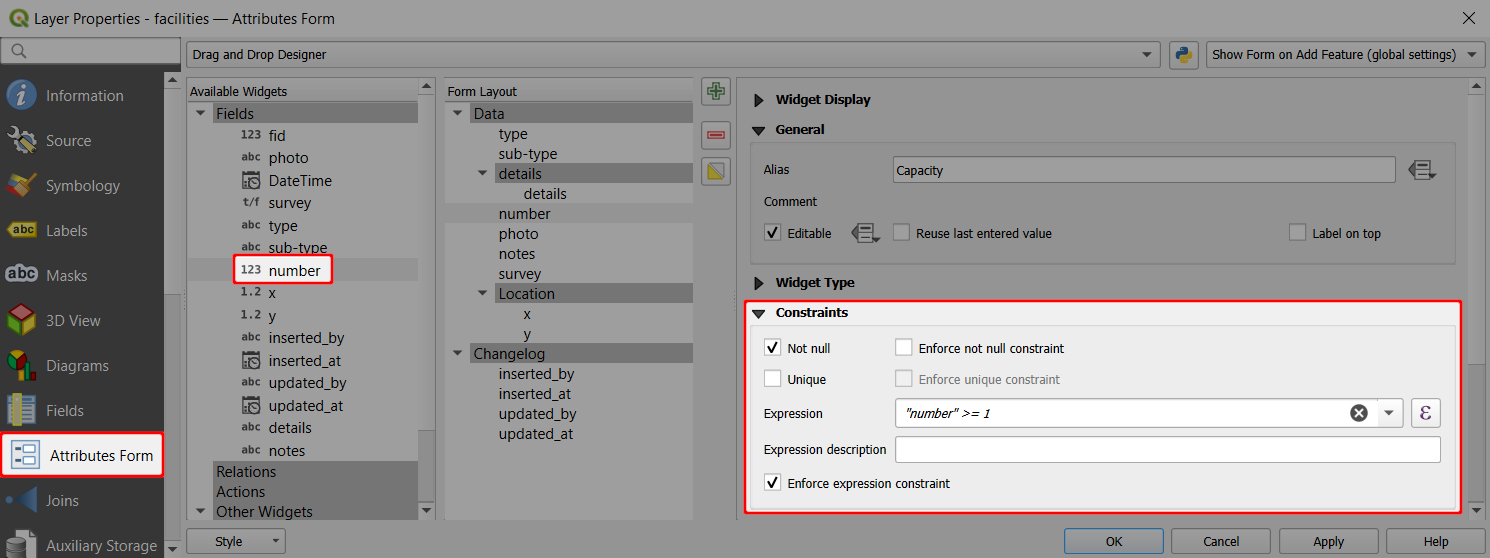
Here, we will first set up a constraint to a field that represents the facility capacity. The value has to be a number that is higher than 0. This will be a hard constraint: if the value is not higher than 0, the feature cannot be saved.
- Right-click on a survey layer and select Properties
- In the Attributes form tab, select a numeric field in the Available Widgets column that you want to use (here:
number) - In the Constraints tab:
- Use the following Expression:
"number" >= 1 - Check the Enforce expression constraint option ✔️
- Use the following Expression:
Now we will set up a soft constraint to a photo field. A photo should be taken during the survey, but the feature can be saved without one.
- In the Attributes form tab, select a photo field in the Available Widgets column (here:
photo) - In the Constraints tab:
- Check the Not null constraint ✔️
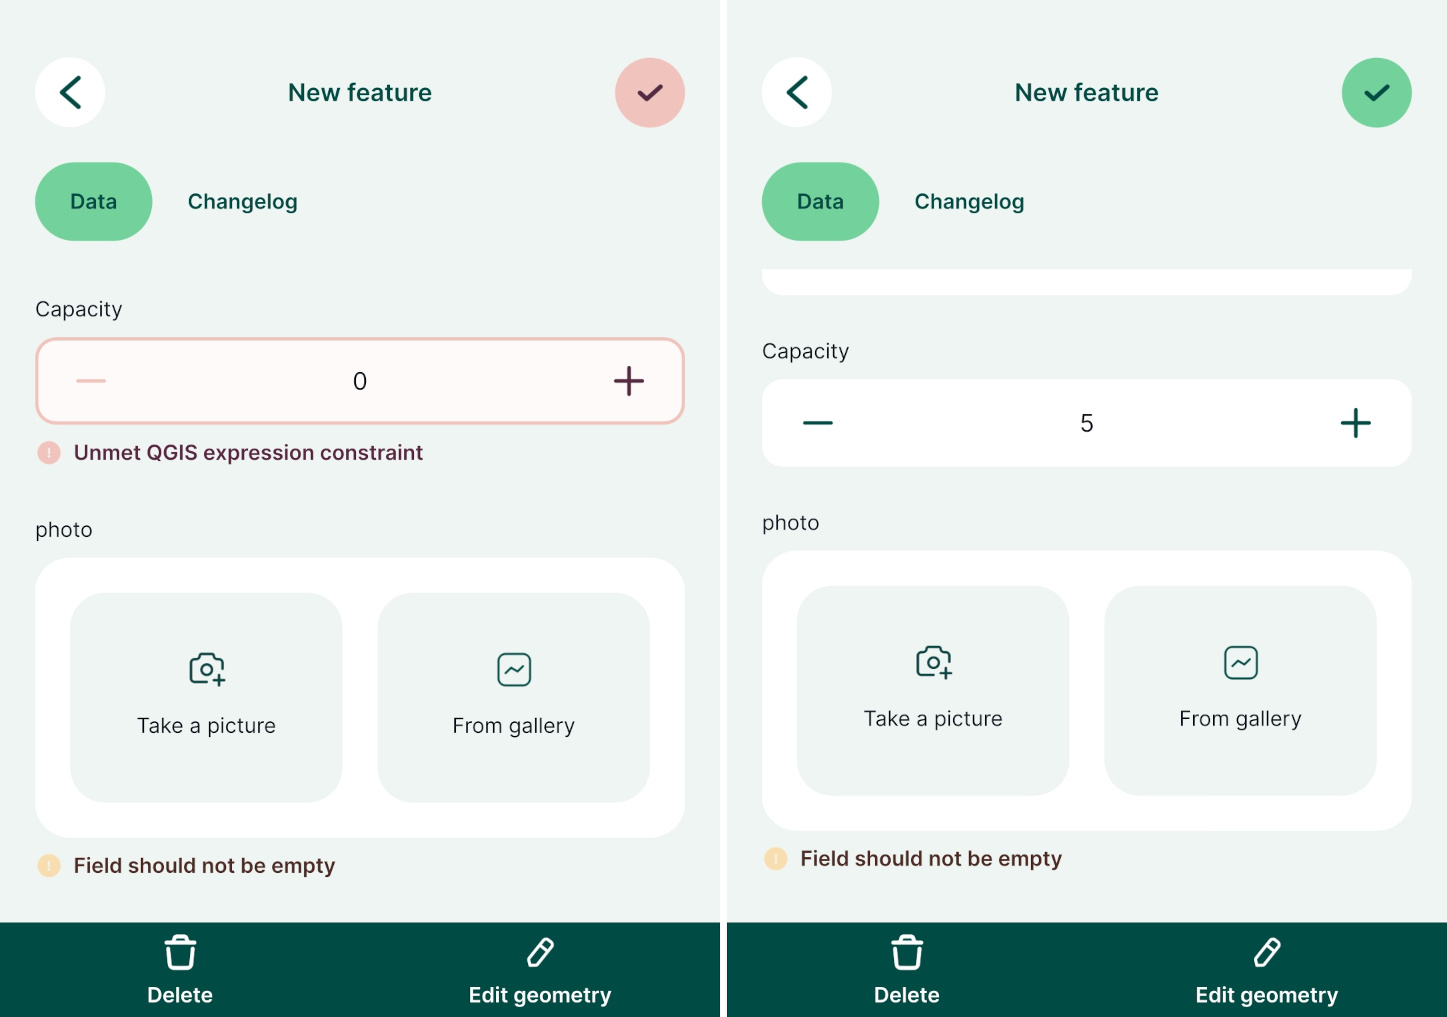
In the mobile app, you will be unable to save a feature unless the field value meets the enforced constraint (here: Capacity). If the constraint is not enforced (here: photo), there will be a warning, but the feature can be saved regardless.
Drill-down forms
Drill-down or cascade forms enable to list values in a field depending on a value selected in another field.
Example project available
Clone documentation/form_setup to explore drill-down forms.
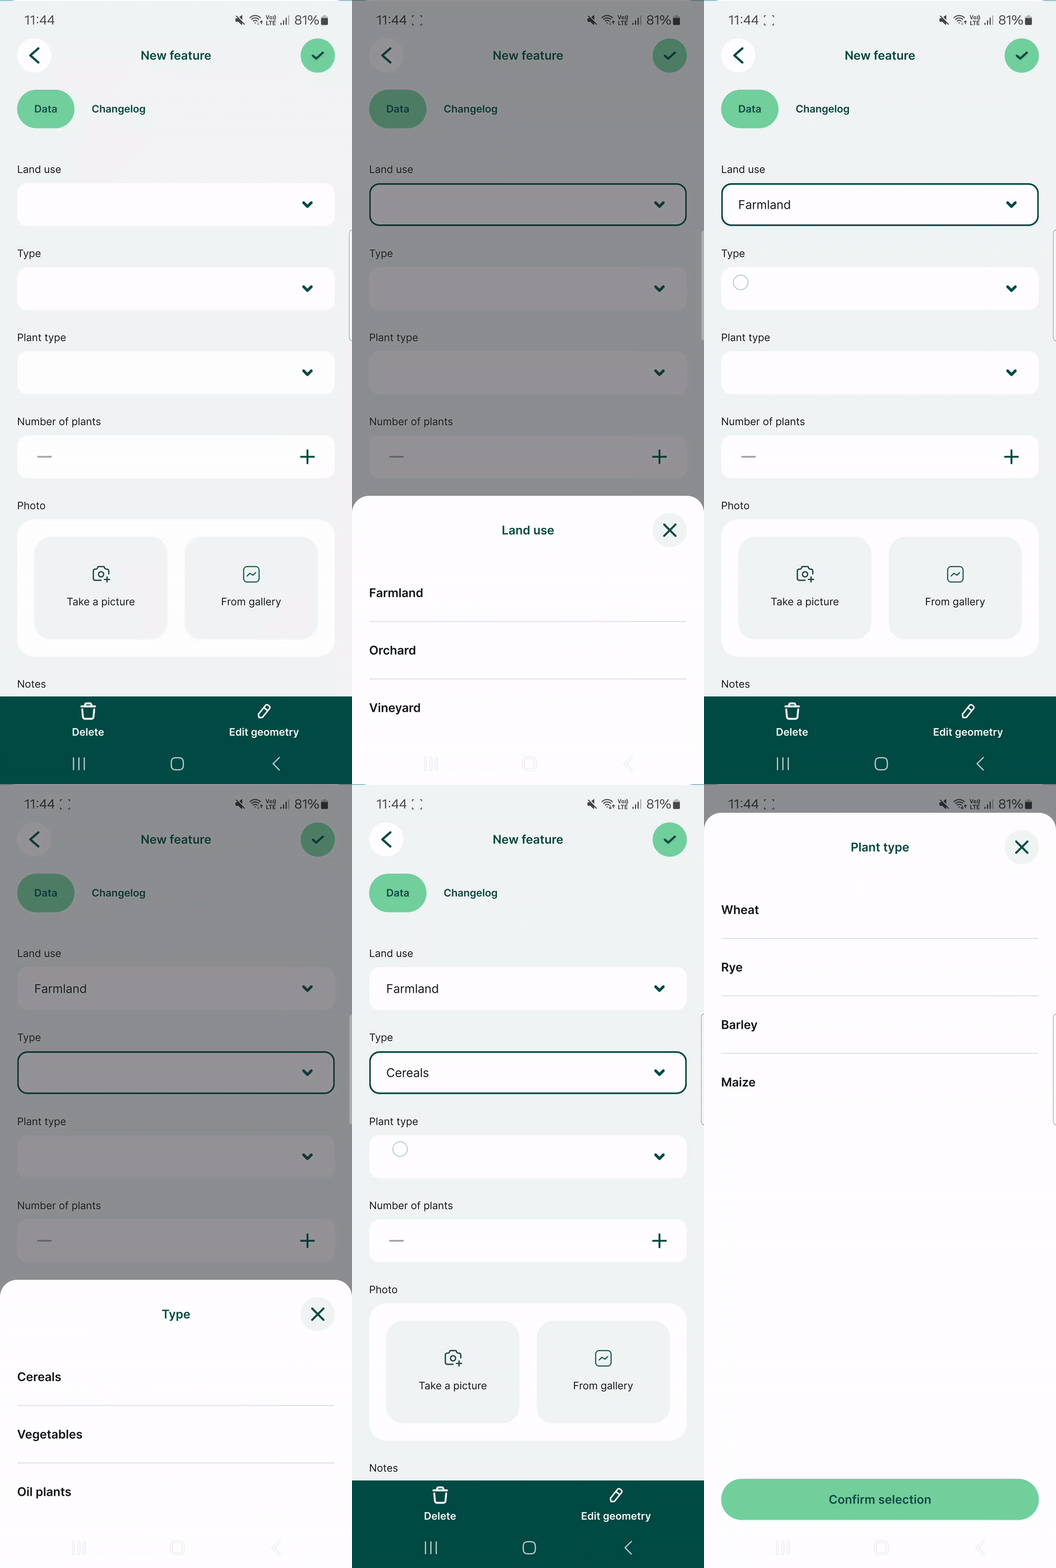
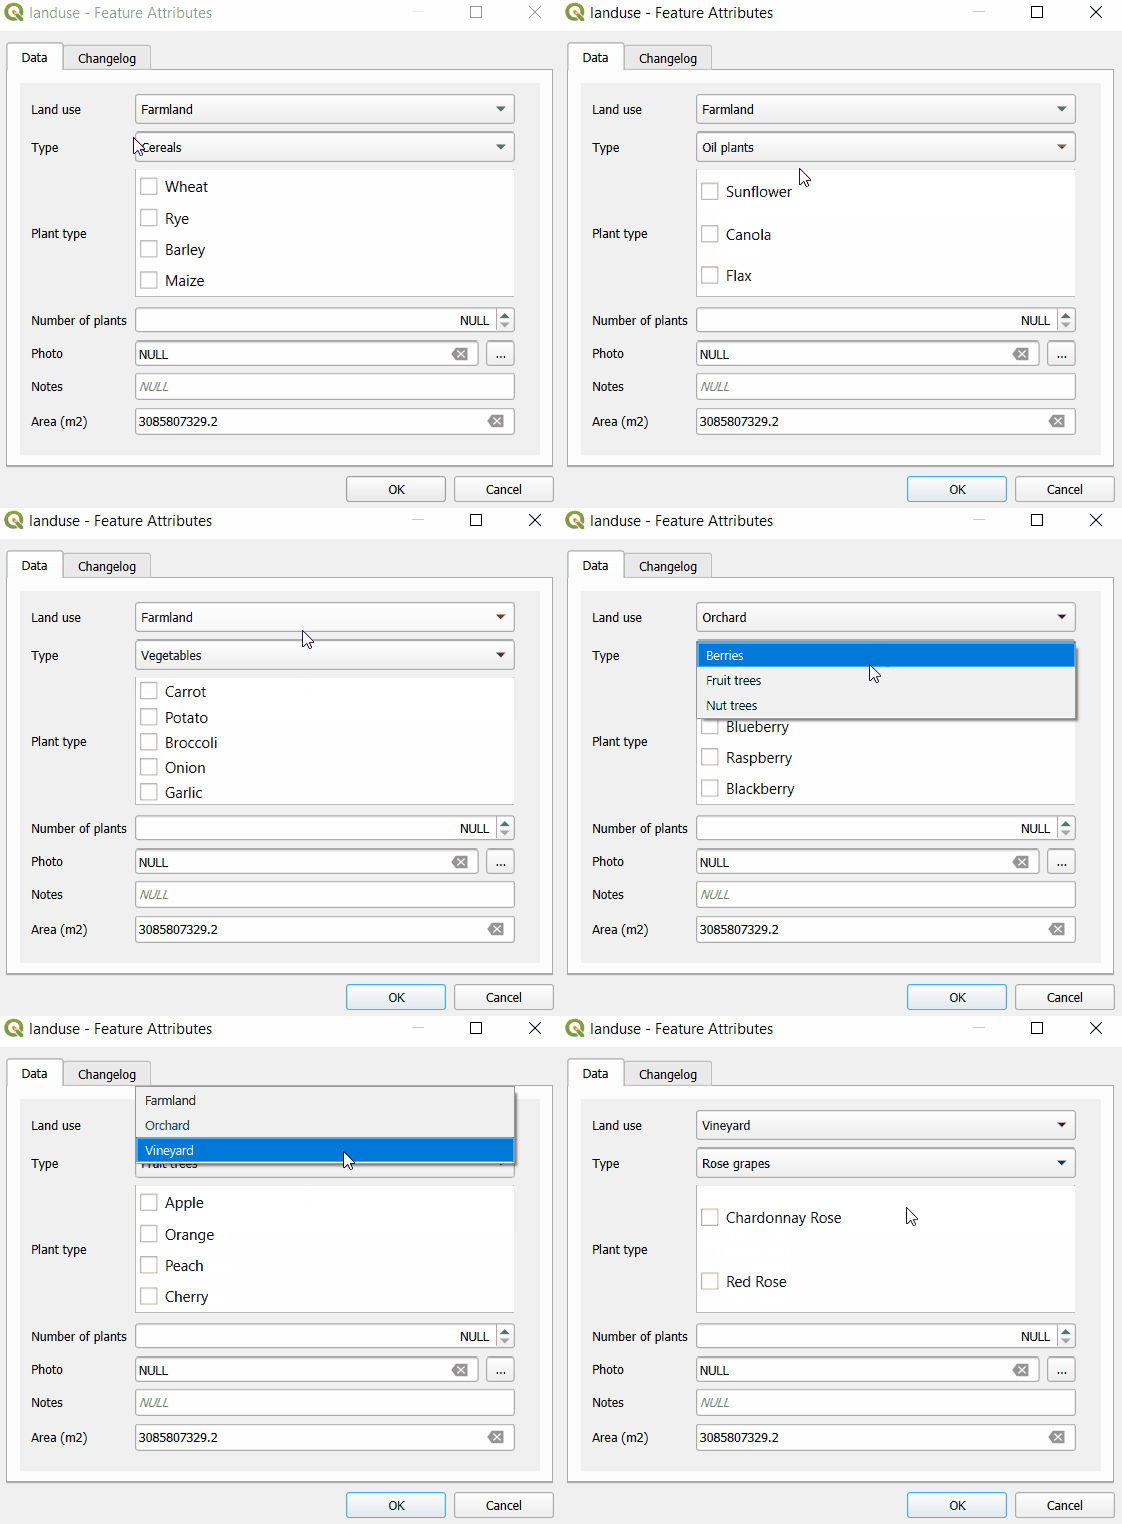
Here, we have a layer named landuse that has fields such as Land use, Type, Plant type. Values that can be filled in these fields depend on the previous choices: if we select Farmland as the Land use, the Type field drop-down menu offers options such as Cereals, Oil plants or Vegetables. Subsequently, the Plant type field has only options that are relevant for the selected type of land use.
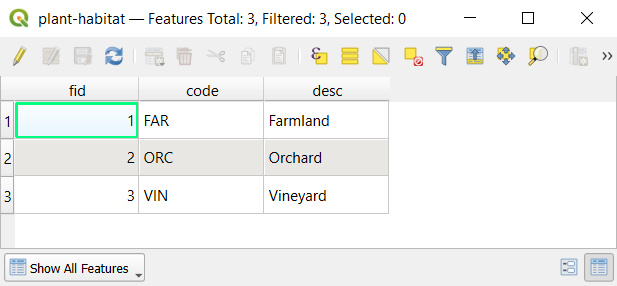
At first, let us explore the structure of value tables that are used to set up drill-down forms. In the example project, Land use field uses plant-habitat value table that has following fields:
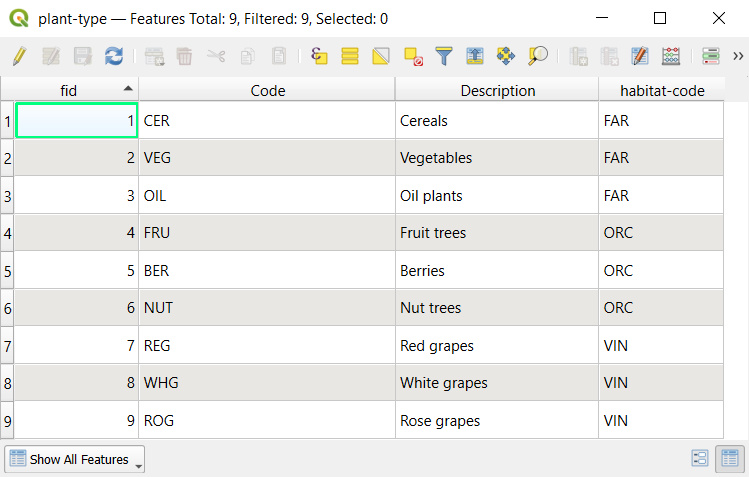
The Type field refers to the plant-type value table. In this table, there is a field habitat-code that refers to a specific code value from the plant-habitat table. For instance, the FAR habitat code (standing for Farmland) is used as the habitat-code for Cereals, Vegetables, Oil plants as these are applicable farmland types.
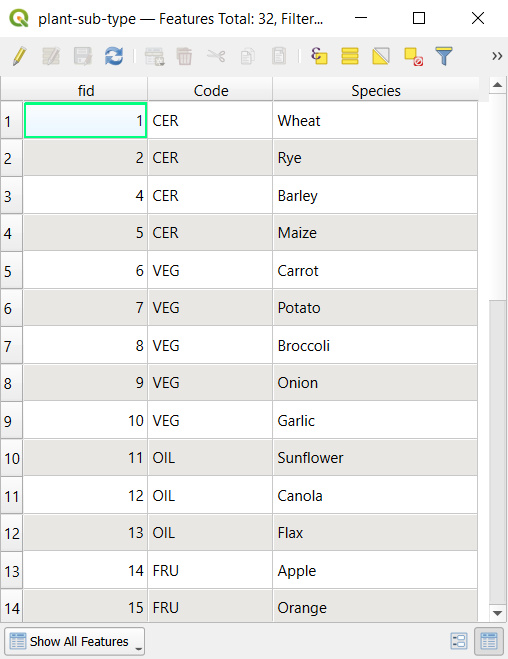
Similarly, the Plant type field uses the plant-sub-type value table that contains a Code field that refers to specific types from the plant-type table. For instance, the CER type code is applied for Wheat, Rye, Barley, Maize, meaning these types of plants belong to the Cereals category.
To set up drill-down forms:
Right-click on a survey layer, select Properties and go to the Attributes form tab
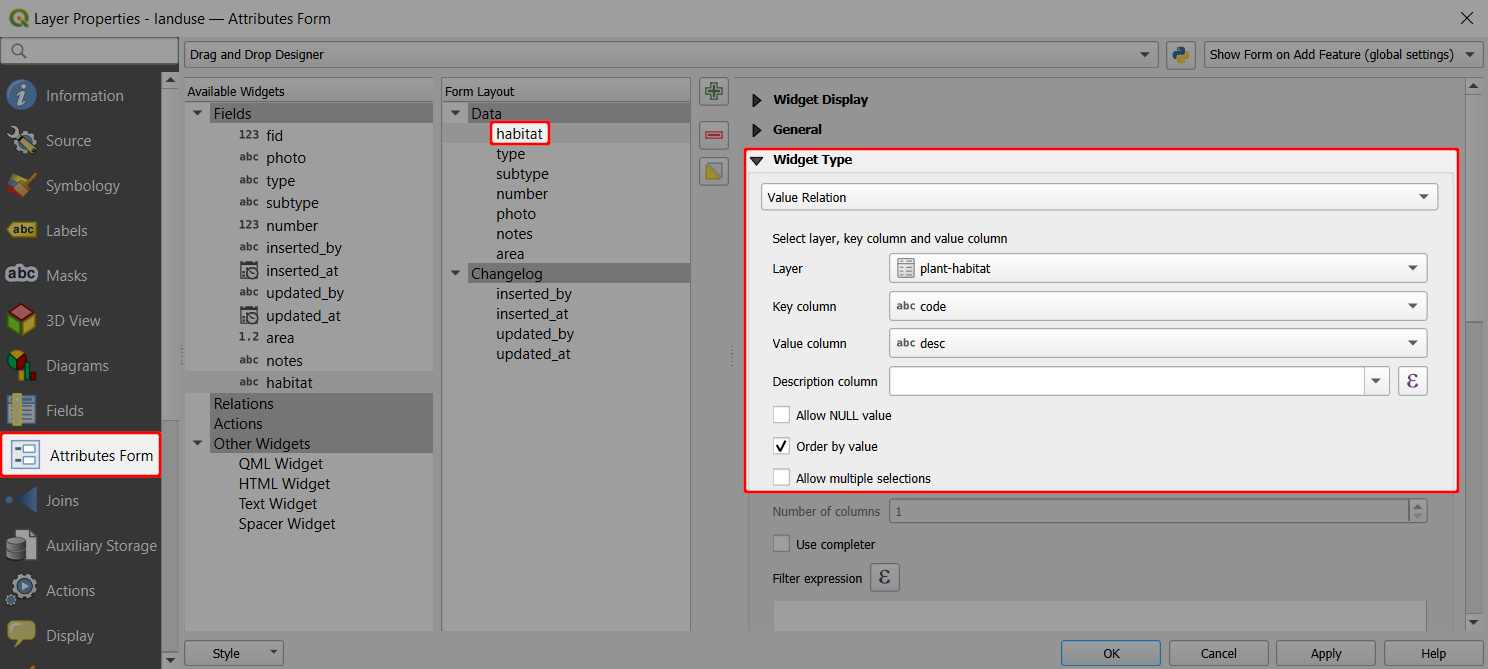
The
habitatfield aliased as Land use is set up using the Value relation widget. Values are defined in theplant-habitattable:- Key column is the field that contains the values (here:
code) - Value column is the field that contains the alias (description) of the value (here:
desc)
- Key column is the field that contains the values (here:
The
typefield (aliased as Type) uses the Value relation widget with values from theplant-typetable:- Key column is the field that contains the values (here:
Code) - Value column is the field that contains the alias (description) of the value (here:
Description) - Filter expression:
"habitat-code"= current_value('habitat')is used to limit the options in the drop-down menu to values where thehabitat-codeof the value is the same as the current value of thehabitatfield.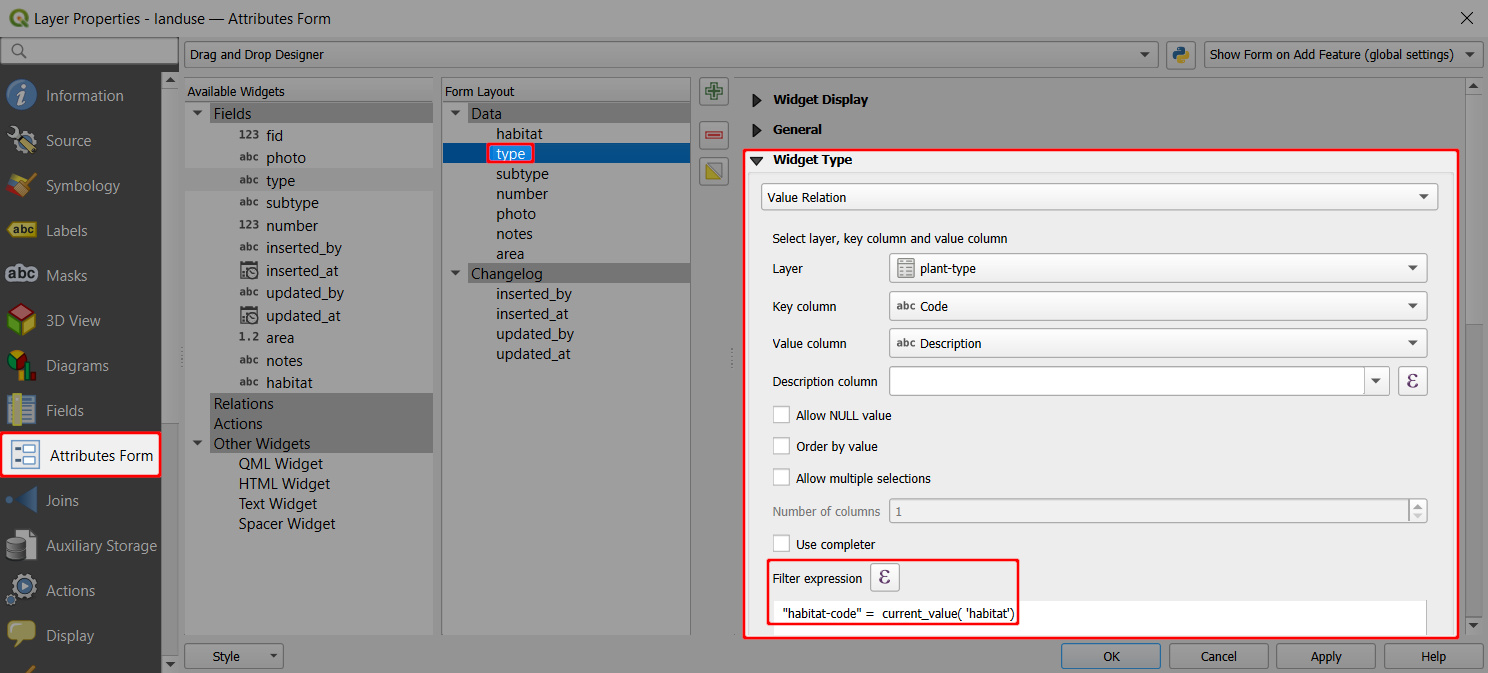
- Key column is the field that contains the values (here:
Likewise, the
subtypefield (aliased as Plant type) uses the Value relation widget with values defined in theplant-sub-typetable:- Key column is the field that contains the values (here:
id) - Value column is the field that contains the alias (description) of the value (here:
Species) - Filter expression:
"Code" = current_value('type')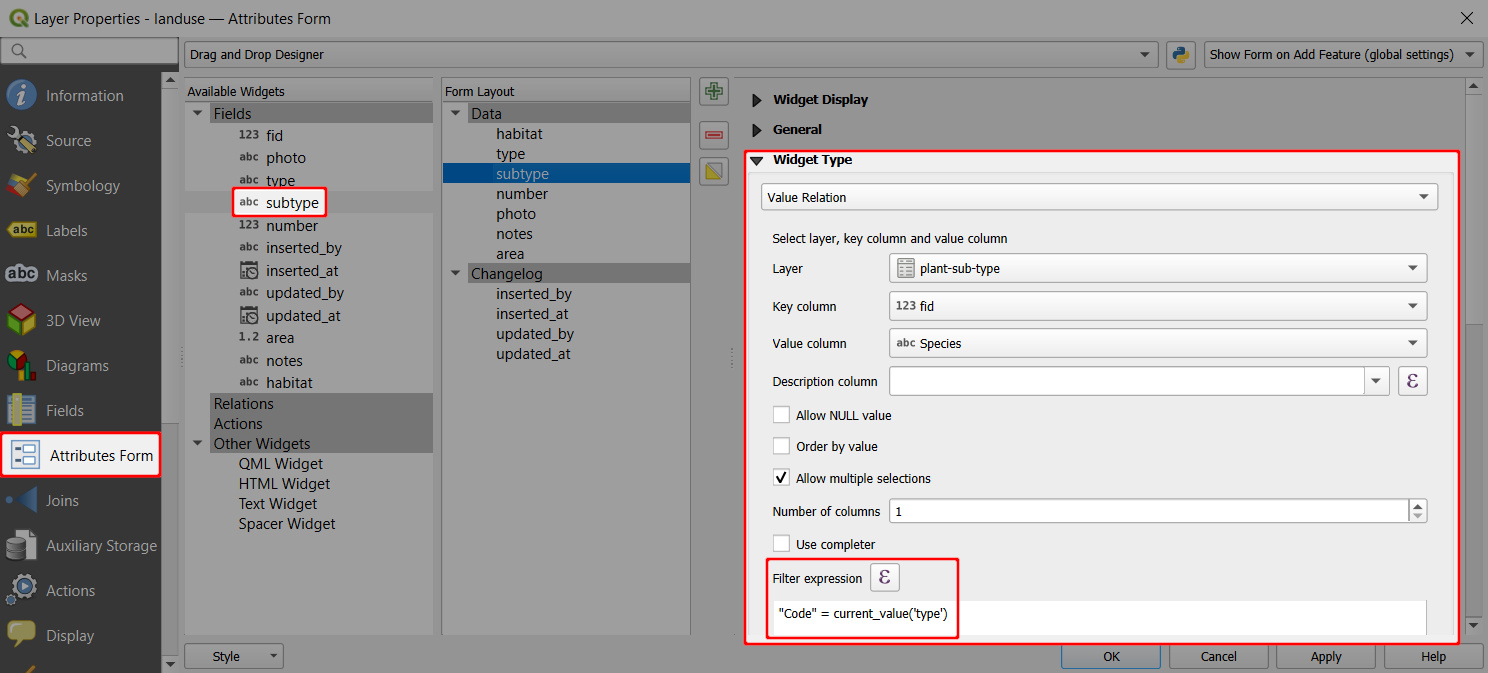
- Key column is the field that contains the values (here:
And this is how the drill-down form looks in the mobile app. After selecting Land use: Farmland, the Type field only offers values Cereals, Oil plants or Vegetables. After selecting Cereals, the Plant type offers only relevant options such as Wheat, Rye or Barley.
